Page 14 of 19
Posted: Tue Jul 24, 2007 2:55 am
by mysta2
for the tank I just sanded all the paint off, no chemical assistance. With all the smaller stuff I wipe it off as good as I can and then take it straight to the wire wheel. I didn't coat anything meaning I'll have to go back and do it all again soon. There are some products out there like Zoop Seal that claim to work as a pretty good sealant but I've never used it. There's also clear powdercoat or Por15s' Glisten PC, both will leave polished metal a little cloudy, but work pretty good with brushed metal (as long as you re-brush it after coating)
On second thought I suppose I did wax Loudbikes tank and that's been working pretty good, I just try not to touch it too much.
I always forget to cancel my signals when I ride a bike that still has them so I usually end up going with hand signals anyway.
on another note.
One of my friends just got his first bike the other week so three of us went for a ride this last Sunday, he cut out at about three and the two of us remaining headed out to Strokers to schmooze with some of the Harley contingent, and hit a major storm on the way back.
Spent half an hour under an overpass letting it pass.


BTW: the fender on his bike is the one that I painted along with my headlight bucket.
Posted: Wed Jul 25, 2007 10:47 am
by mysta2
A couple of co workers of mine came across this scanning software a few weeks ago… how timely.
Instead of building 69s’ fairing by hand I’d like to do it in ProE. That way I don’t have to stress over symmetry and I can have all the data already in hand for future additions and modifications. The catch is the frame, the fairing needs to ride really tight to the frame for the way I want it to look and work, so I need some really accurate data in ProE if I am going to be successful.
That’s where David comes in.
First step is getting the frame white. It’s far from being paint ready, so I’m shooting it with just a coat of white base with no primer. That way I can rub or dip it clean with lacquer thinner.


There were a few spots that gave me trouble, I shot it pretty dry so that the paint wouldn’t have time to react to any of the grease or dirt on the frame. It wasn’t as difficult to shoot as I was afraid it might be.


Scan setup

Scanning

All you need is a camera, laser level, and a printer. (
http://www.david-laserscanner.com/)


The program doesn’t like the frame very much, It’s built mostly for parts that have a lot of nice large surface that it can stitch together. I have a lot of work ahead of me trying to get it all fleshed out, but it’s one step in the right direction.
Posted: Wed Jul 25, 2007 4:35 pm
by TheJones
Thanks for the info. I'd like some of the metal cloudy like a dull aluminum. I may give those products a go. Hopefully they will give the desired effect.
Thanks MR2!
Posted: Thu Jul 26, 2007 5:36 pm
by Desmodork
Registered just so I could say Thanks! for the great posts!

Inspiring enough to hang your shots in my garage while I tear into my 1974 CB360.

Here are a few shots. I hope it will inspire you at some point, but I'm a long way from complete.
Straight off the trailer. $400 and runs...

All apart. Need to decide a lot of things, but I do know it will be a cafe racer!


Someone took the time to make this part out of wood and bondo! Wouldn't it be safer and easier just to buy a complete used tree?


All...my...friends...know the low rider.


Tail section patterns. I am going to keep the electric start ("wimp"!...I know...I know!) so I need the big battery. It will go under the seat pod...I think.


[/url]
Posted: Thu Jul 26, 2007 5:45 pm
by blues2cruise
If you were to turn your frame around and scan it again or scan it at a couple of different angles, would it fill in the blanks for you? (I'm curious...because I have no idea about that stuff)
Posted: Thu Jul 26, 2007 5:56 pm
by Desmodork
blues2cruise wrote:If you were to turn your frame around and scan it again or scan it at a couple of different angles, would it fill in the blanks for you? (I'm curious...because I have no idea about that stuff)
Yes, but putting those multiple scans together is a real bug-a-boo! The guys that can do it well are good people to know!
Posted: Tue Jul 31, 2007 1:41 am
by mysta2
That's actually how the program works, there's two pieces of software. The first is purely for scanning and the second is for combining the scans and outputting one complete file (the first one's free, the second's $60). The only problem is that the second program (Shapefusion) looks for big common surfaces to use in mating the scans... because the frame really doesn't have any of these surfaces it has a lot of trouble. I thought about hanging a big piece of foamcore in the middle of the frame next time I scan it, but haven't tried it yet. I still think I can work with what I have.
The screen shot image is only one of about 16 scans I did.
New page, new sketch. My current Ideas for Squid:

I know it's not really in keeping with the name I chose to do a bobber, but that cb400f was really inspiring
Posted: Fri Aug 10, 2007 11:37 pm
by ceemes
Hi Mysta,
Been enjoying your blog and what you have been doing to classic Honda Customs....nice work.
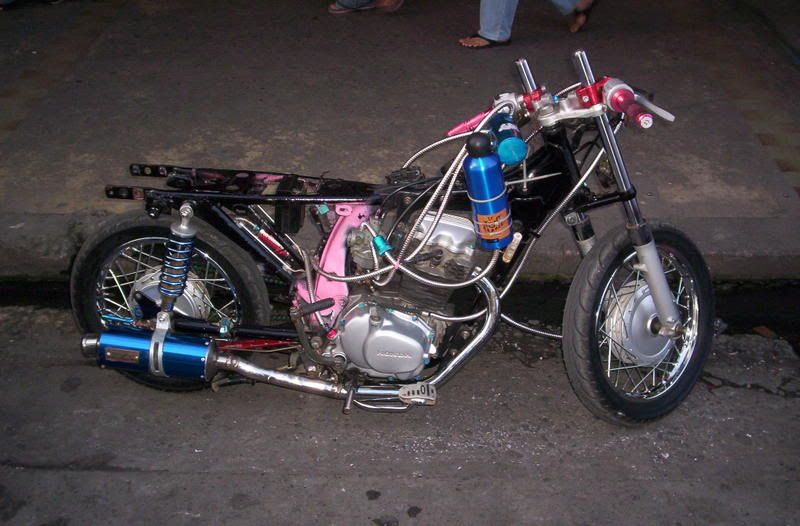
Hope you don't mind, but I thought you might like a look at a Street Fighter/Cafe Race I came across in Tacloban, Philippines. And yes, that blue bottle on the side is a standard water bottle pressed into service as a flippin' gas tank!!!!
Anyways, take care
Ceemes
Posted: Wed Aug 29, 2007 2:41 am
by mysta2
this little bugger can be a pain sometimes:

first, remove snap ring

then you can thread a 6mm bolt (I'll often use one of the case bolts) into the center

If the bolt's long enough (any one of the case bolts is) it will bottom out...
...and push the plug out

messy


some scraping, and some compressed air...

...get you something like this:

Those grooves are there so that you can use a bolt to push the plug out without the whole thing spinning, make sure before you tap it back in that the fins on the plug line up with the grooves in the cup.
The O ring is easy to miss when it's all dirty in there, don't forget about it. You can see it in the third picture one the plug.

You should replace this, but I didn't have one and my 303 made it nice and squishy again, so I just reused it.
and a little tap

don't forget about the pickup while you're in there

after blasting with some WD40 and my garden hose

[quote=ipaisgreat]Have you had any probs with the timing chain[/quote]
that motor's still MIA

Posted: Wed Aug 29, 2007 2:46 am
by beardking
Mysta, any suggestions on some place locally to get a seat recovered? I don't want anything fancy, just need to get the stock seat on my Nighthawk recovered with stock looking material.
Nice photo log you have there.