Page 1 of 2
Rattlecan Paint Project
Posted: Sat Oct 01, 2005 11:26 am
by shoey949
Well, I will be attempting to repaint my bike this winter, and I have a few questions.
1. What kind of paint to use, enamel, lacquer or other?
2. What brand of paint to use, where to buy, and where to find a color index?
3. Number of coats of primer,paint, and clear, and when to sand with what?
4. How to use a rubbing compound, it is only used after all painting is finished?
5. I have a few small dents that I will be filling with bondo in layers, should I use something else over it before I prime it?
I know that Chris did a rattlecan project on his Hurricane and will be using that as a reference, but I'm planning on my being a little more basic, and I just need some simple instructions.
Thanks,
Nate
Posted: Sun Oct 02, 2005 7:29 am
by ronboskz650sr
For single color or base/clear paintjobs, the back of the can is surprisingly good for basic instructions. What they leave out is all the sanding you need to do to get a super finish. I think most of that is covered in the other threads. Pay close attention to dry/recoat times. And stick with one manufacturer and type of paint from start to finish.
Re: Rattlecan Paint Project
Posted: Thu Oct 06, 2005 11:44 am
by cellarartist
shoey949 wrote:Well, I will be attempting to repaint my bike this winter, and I have a few questions.
1. What kind of paint to use, enamel, lacquer or other?
2. What brand of paint to use, where to buy, and where to find a color index?
3. Number of coats of primer,paint, and clear, and when to sand with what?
4. How to use a rubbing compound, it is only used after all painting is finished?
5. I have a few small dents that I will be filling with bondo in layers, should I use something else over it before I prime it?
I know that Chris did a rattlecan project on his Hurricane and will be using that as a reference, but I'm planning on my being a little more basic, and I just need some simple instructions.
Thanks,
Nate
Go with a urethane paint. As said before, follow the instructions for best results. If they are too vague, then follow this:
Prep your metal/plastic by scuffing everything you are painting with a red 3M Scotchbrite pad. Get rid of ALL the shine. Or you can remove all the paint with a DA sander and 80-120 grit paper. Depends on your time limits and quality you are going for. If there are dents, you need to scuff these areas with 80 grit paper and then apply your body filler. Let the stuff dry and then sand with 120, finish with 400. Go with 3 even coats of grey primer. Add extra primer over your areas with filler. Finish with a light dusting of black trim paint over your primer as a guide coat. Wait 24 hours, then wet sand with 500 grit. Your low spots will stay black. Build up these areas with filler and reprime them. I would suggest using a sealer as a holdout against absorbing, but that's your choice depending on how much you want to spend. Your basecoat will be 3 layers. Start your base coat with a dry coat to promote adhesion, then do a wet coat. Wait until it's tacky, then do a final coat. They key is to try and be as 'robotic' when you are painting as possible. Try to do a 50% overlap to prevent 'banding'. Wait for that to dry, then break out your clear. Give it a dusting coat, then 2 wet coats allowing dry time in between. Wait 24 hours, then wet sand with 500 grit. USE A SOFT BLOCK to prevent burning through your clear. This will give you a more uniform sanding. Clean off your parts and then apply 2 more coats of clear with drying time in between. Wait 24 hours. If you want a really clean finish, you need to lightly resand everything with 1500, then 2000. Afterwards, you can apply your buffing compound and buff everything to a high luster. Finish with a hand rubbing glaze. Enjoy your project! Hit me up if you have any questions...
Some stuff I've painted...


Posted: Fri Oct 07, 2005 7:01 am
by ronboskz650sr
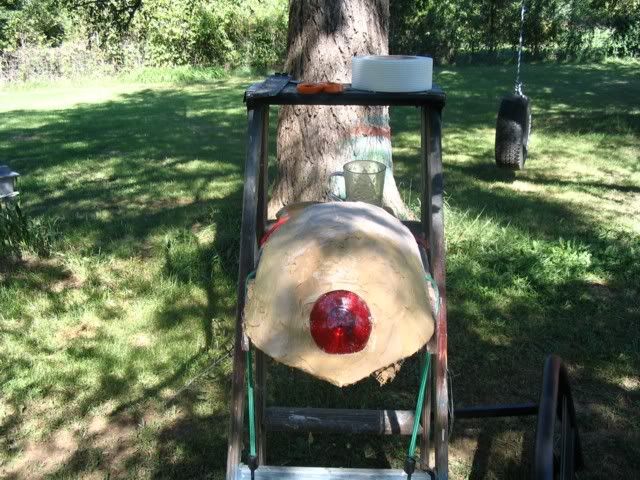
You should get all your really low spots fixed before you put primer on. Using a fog coat helps you sand through the primer layers for light depressions during final surfacing. You want the fog coat to disappear by the time you finish sanding. Bondo doesn't stick permanently to paint, and will eventually loosen if you apply it to the fog coat. If you need to fill a depression after paint or primer is applied, use glazing putty in very thin layers, and let it cure before you sand it and especially before you paint it. It shrinks under the paint if you don't, and will leave an outline of the repair. I use polyester filler that is a gold color before you add the hardener. As the low spots get smaller, and for tiny low areas, I mix it with more hardener. This serves two purposes. The color is different (like a fog coat), and you don't need as much working time for tiny low spots, so why wait so long for curing? If you have your filling planned out, you can fill many little spots in a very short time this way. Then they are all ready to file/sand at the same time. For example, here's a seatpan and tailpiece fabricated from fiberglass, using common household objects and duct tape as a form. The final shape has imperfections that need smoothing. Here you can see three different colors of polyester filler. It just helps keep track of the layers, like a fog coat. Just my .03.
Posted: Fri Oct 07, 2005 9:01 am
by shoey949
alright, I have a little bit of surface rust in the tank, what is the best way to take care of that? Also what sort of filler should I use, I have some decent size dents, from what I've read i SHOULD use fiberglass filler, but what brand/type? Also what company makes urethane paint in a rattlecan, where can i get it, and what are it's advantages over enamel?
Thanks,
Nate
Posted: Fri Oct 07, 2005 2:59 pm
by ronboskz650sr
I use a product called DYNA-HAIR. There are quite a few makes, probably all just fine. For the top layer, Use a polyester filler...either Bondo premium Gold, or another brand, like DYNA-MITE. It sands out smoother with fewer voids, and stays flexible to prevent cracking. I don't know if a one part polyurethane offers any advantage over one-part enamel or lacquer, and may not be as easy to find. Most of the urethane spray cans I've seen are for indoor use, and will discolor outside. I'm not sure what other kinds there are. If you can spray with a gun, two-part acrylic urethane is an option, but so is two-part enamel with a hardener...both at much higher cost than spray cans. The urethane is more toxic than the enamel...Isocyanates...like superglue, only much higher levels in the air from spraying. This will harden in your lungs if you breath it...very bad for you...permanently! Always follow the safety instructions regarding respirators.
For the rust inside the tank, you can use muriatic acid from the hardware store, or tub and tile cleaner containing the same thing. There is also a POR 15 kit, with several steps for cleaning and coating. Personally, I would use Naval jelly, and put an old chain in there and shake it around. Follow the rinsing instructions, and spray wd-40 in there to prevent flash rust as you fool around with painting it.
Posted: Fri Oct 07, 2005 5:10 pm
by shoey949
sorry, I meant that there was rust on the outside.
Posted: Fri Oct 07, 2005 5:20 pm
by ronboskz650sr
Sand it out if the pits aren't too deep. Use Naval jelly if the pits are too deep to sand out, then rinse, dry and spot fill with polyester filler. Where you use fillers, make sure to sand with coarse grit paper for a good bite into the metal. Usually the can will give a recommendation, but I just use 60 grit and be done with it.
Posted: Sat Oct 08, 2005 5:57 am
by ronboskz650sr
I wantged to elaborate a little more on the fog coat, if you do it. When all your paints are from the same manufacturer, there's nothing preventing this, and it's a good idea. Just don't grab some other can that's laying around to save a few bucks. Incompatibilitiet can cause lifting and bubbling, and alot more sanding. Also, as you block out the parts, use sanding sponge backers, so you can block sand and still follow the many contours on a motorcycle. As you sand the fog coat, count the actual forward strokes, and move the sponge to make sure you sand everything the same amount . I use 10 strokes, move the sponge, 10 strokes, etc. Sand in an X configutation doing one side of the x all the way across the part, then do the other side of the x for the full length of the part. This maintains the straightness of the panel, and will give you a surface that looks like glass when you paint it. Now the fog coat may frevel low colored spots. If you fell you've sandes enough...STOP. Add primer surfacer, a high build type is what you should be using. Spray the low spots with a full coat...let flash...and spray the whole piece with a full coat. Now when you sand, the low spots will be the same color, so wet sand to break the surface...let it dry and dry sand it with 320 grit using blocking techniques. Now your low spots will show as unsanded areas and will be easy to see, without a fog coat. Tap your paper on something hard frequently to keep it clean...it will clog faster with no water. The advantage to this method is you can tack cloth it without having to wait for it to dry before you can paint. This is time-consuming enough, why drag it out any more. When your piece is one color, and shows no unsanded areas...run your fingers over it. If you can feel it, it will show i the paint. Here's something I recently painted (yesterday), right from the can...it's enamel, not sanded or buffed, and this isn't the final coat..more sanding between coats for enamel..
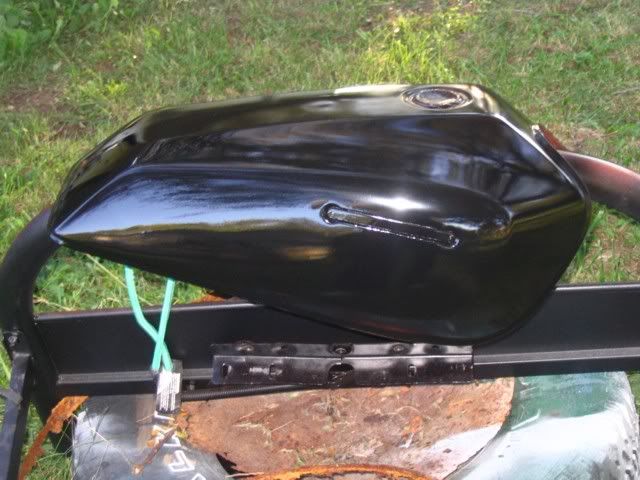
Here's another one...this one is lacquer, not sanded or buffed...but it had full preparation before this coat.
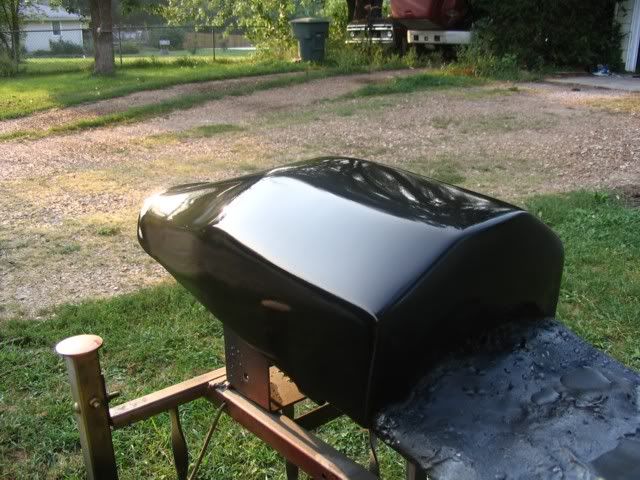
The preparation is the key...the more you do, the better it will look
Posted: Sat Oct 08, 2005 10:55 am
by ronboskz650sr
Here's the tank after wetsanding, dry, tack cloth...recoat. Starting to look like something.
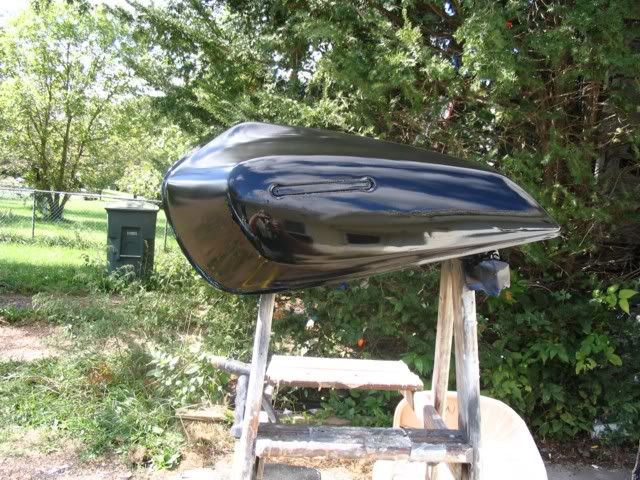
You can seee the clouds in the sky, the house, ans me with the camera in the lower left corner..this is going to look nice when it's finished.