If the front door is open, the whole house is... Glad to see everyone helped themselves.. maybe it'll teach someone a lesson.CNF2002 wrote:Based on the first pic, only the top was open? So you opened further drawers to steal more tools...if the rule had any basis it would only apply to those drawers that were left open. Otherwise its breaking and entering! You thieves you!
Honda 599 New to Now
-
dr_bar
- Site Supporter - Diamond

- Posts: 4531
- Joined: Mon May 23, 2005 4:37 am
- Real Name: Doug
- Sex: Male
- Years Riding: 44
- My Motorcycle: 2007 Yamaha Royal Star Venture
- Location: Surrey BC, Canada
~~~~~~~~~~~~~~~~~~~~~~~~~~~
"Four wheels move the body.
Two wheels move the soul!"
"Four wheels move the body.
Two wheels move the soul!"
-
Sev

- Site Supporter - Gold

- Posts: 7352
- Joined: Sun Jun 06, 2004 7:52 pm
- Sex: Male
- Location: Sherwood Park, Alberta
The top is a single unit, and was emptied. The bottem was locked and was left alone.CNF2002 wrote:Based on the first pic, only the top was open? So you opened further drawers to steal more tools...if the rule had any basis it would only apply to those drawers that were left open. Otherwise its breaking and entering! You thieves you!
Of course I'm generalizing from a single example here, but everyone does that. At least I do.
[url=http://sirac-sev.blogspot.com/][img]http://i12.photobucket.com/albums/a227/Sevulturus/sig.jpg[/img][/url]
[url=http://sirac-sev.blogspot.com/][img]http://i12.photobucket.com/albums/a227/Sevulturus/sig.jpg[/img][/url]
-
blues2cruise
- Moderator

- Posts: 10184
- Joined: Fri Apr 22, 2005 4:28 pm
- Sex: Female
- Years Riding: 16
- My Motorcycle: 2017 Africa Twin 1000cc
- Location: Vancouver, British Columbia
-
Sev
- Site Supporter - Gold
- Posts: 7352
- Joined: Sun Jun 06, 2004 7:52 pm
- Sex: Male
- Location: Sherwood Park, Alberta
Okay, the older guy is the instructor... and if you look close everything went straight into the drawers under his toolbox. Though, it did take classmate literally 10 minutes to notice his looted toolkit. He stood next to it looking at his parts, then through his manual, then at his parts, then through the manual. I tried to hang around to snap a pic of him, but he was so oblivious to it that I had to just give up after a while. Apparently the reaction was pretty impressive though.
Of course I'm generalizing from a single example here, but everyone does that. At least I do.
[url=http://sirac-sev.blogspot.com/][img]http://i12.photobucket.com/albums/a227/Sevulturus/sig.jpg[/img][/url]
[url=http://sirac-sev.blogspot.com/][img]http://i12.photobucket.com/albums/a227/Sevulturus/sig.jpg[/img][/url]
-
Sev
- Site Supporter - Gold
- Posts: 7352
- Joined: Sun Jun 06, 2004 7:52 pm
- Sex: Male
- Location: Sherwood Park, Alberta
Okay, what did I do on Wed?
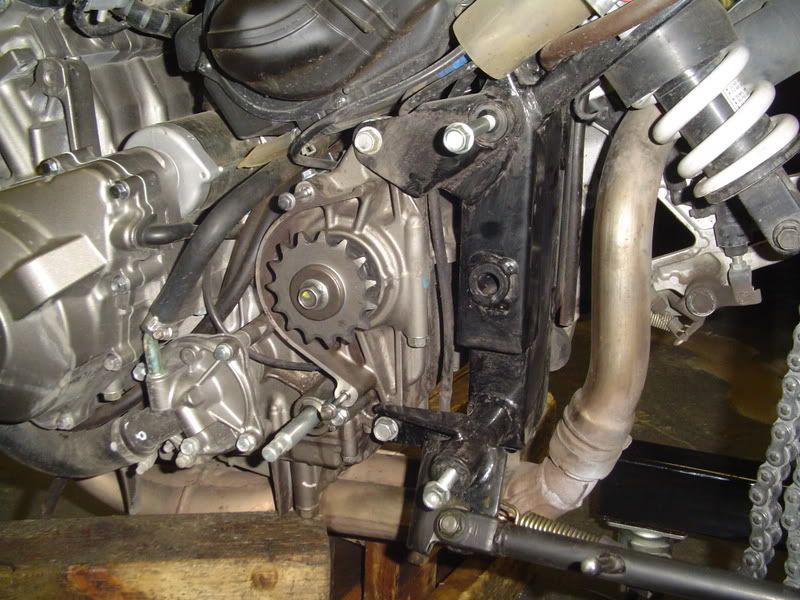
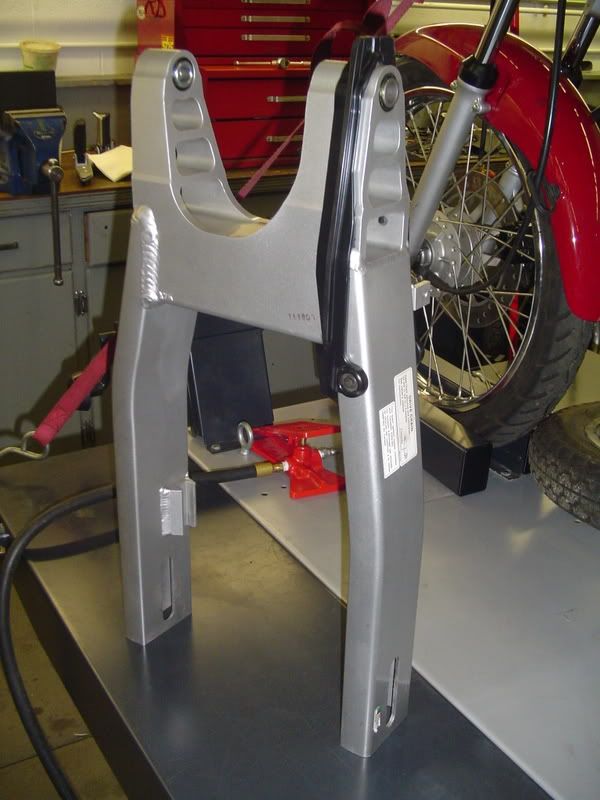
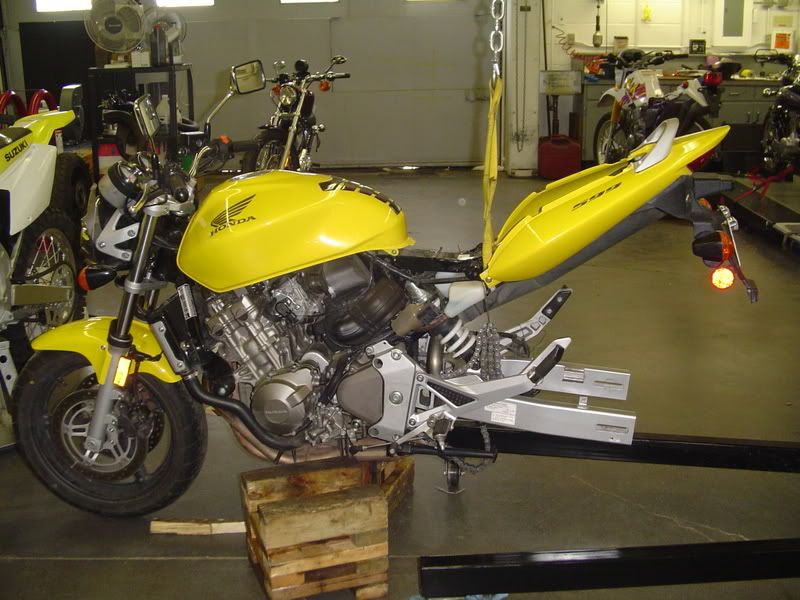
I rebuilt a swing arm... and this is how she goes.
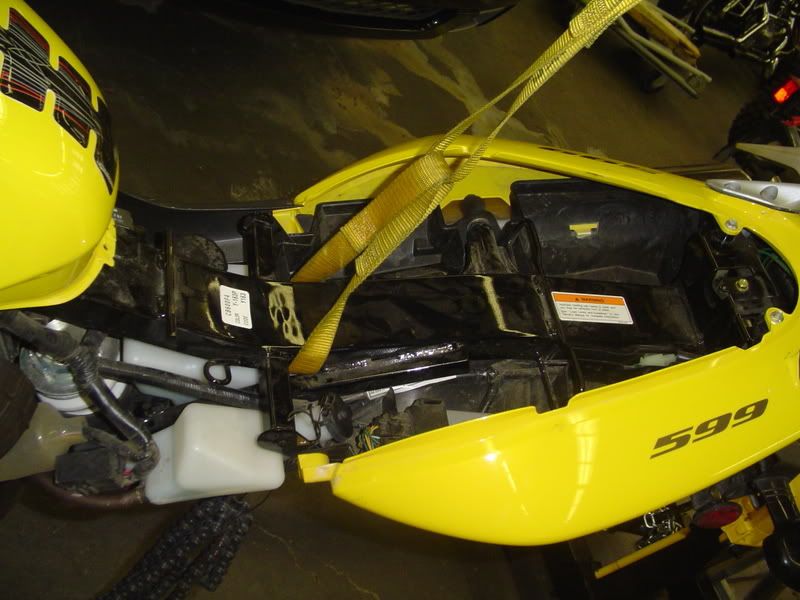
Hang her high! She with the swing arm off there's no way for me to possibly jack up the back end on my bike. All it takes is an engine lift and a come-along.
Start here... YIKES! Nothing on that bike, I bet it dropped about 50 lbs. Supersport here I come!
Pile of parts, all of these plus more go back onto the bike! I've got a sidepanel, seat, 2 swingarm adjusters, an axle, and a pivot bolt hidden inside cupboards and drawers.
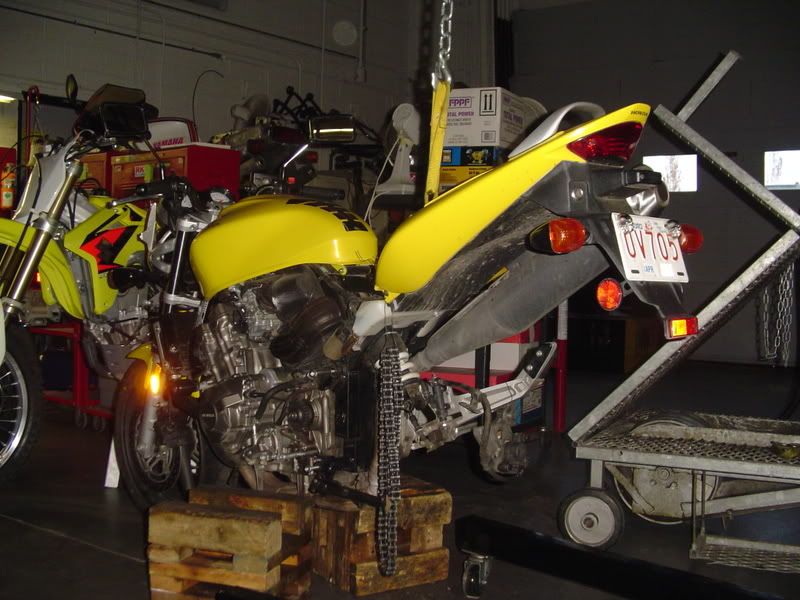
I took the time to clean and relube my bearings. The left side has 2 sets of roller bearings, with 2 bushings and rubber seals. |Bushing|Bearing|Bearing|Bushing|. Make sure they roll smooth and pack some new water-resistant grease in there.
The left side is a set of needle bearings, so I just cleaned them up, added some new lube and put the bushing back inside it.
All my bearings were in good condition.
Make sure that everything is clean and dirt free, relatively speaking that is.

Stuff is tied up out of the dirt. You don't want a heavy brake caliper hanging from the brake line, or a chain sitting in the dirt.
Reinstall the chain slider on the swingarm. It's just a little bit of rubber, but it gives the chain something smooth to ride along, instead of cutting into the metal of the swing arm. I know two people that has happened to so far. Mines in good condition, so I should be okay.

Stick the swing arm into place, and secure the lower shock mount bolt, but don't torque it yet.
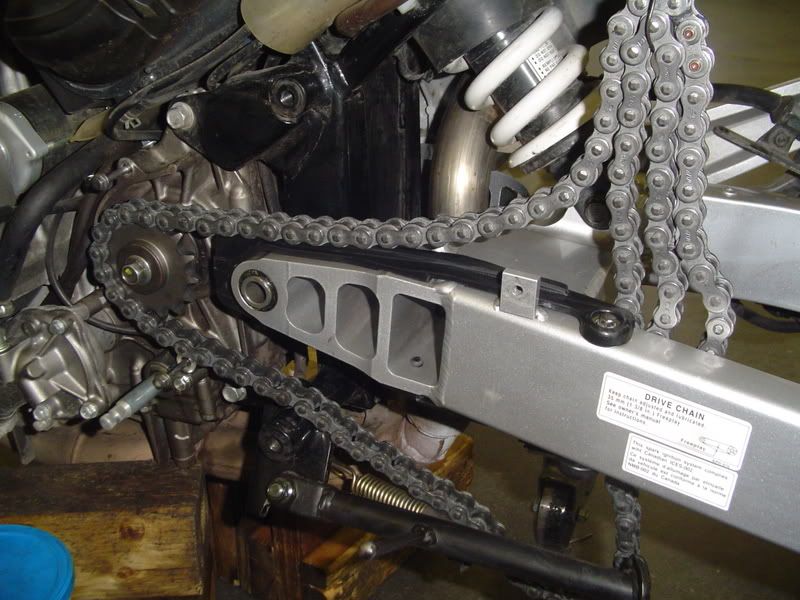
Make sure that the chain is correctly looped inside of the swingarm. I wish that I had waited until now to install a new chain, I could have done an endless one instead of a rivet-type.
Install the side plate and the swingarm pivot mount. Grease the pivot bolt with waterproof grease, just in case. Torque the pivot bolt and lower shock mount bolt into place.
Install the footpeg hanger bracket. I ran into problems here, which will be detailed later.
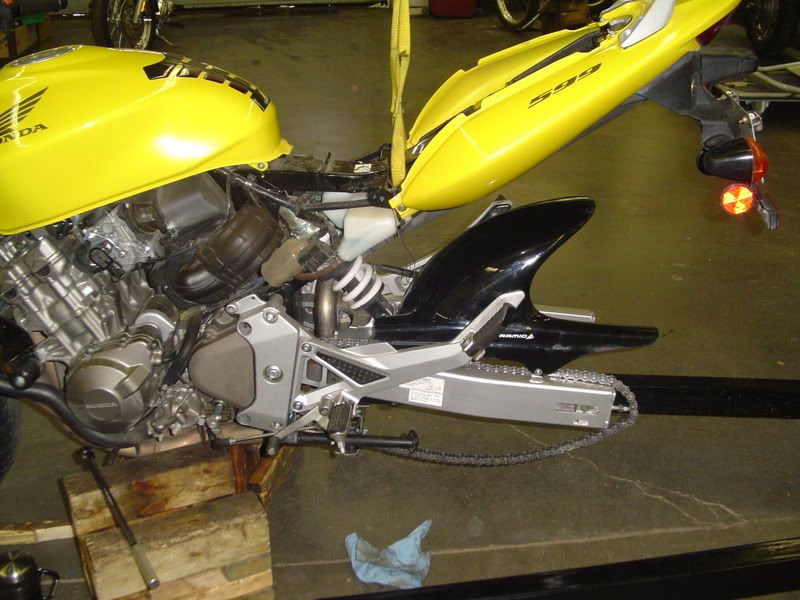
Install aftermarket hugger This keeps the road grime off the rear shock, and looks neatospiffycool.
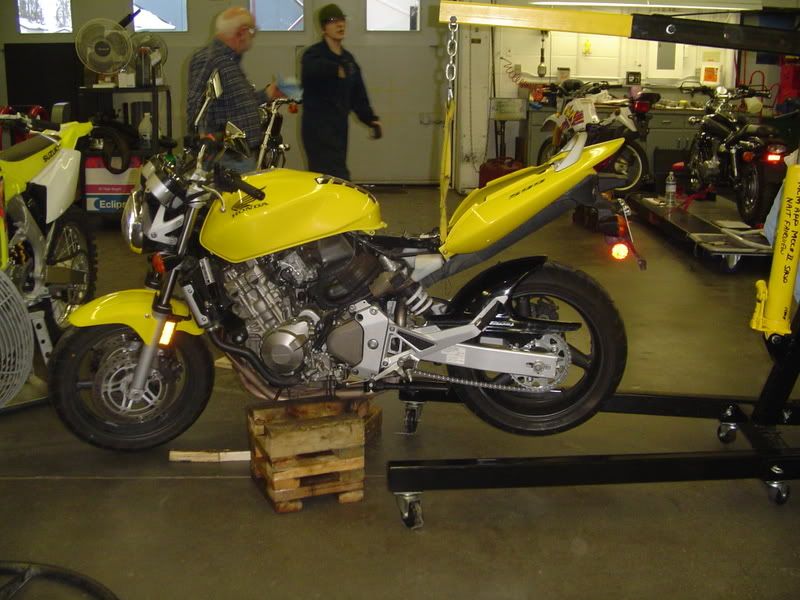
Put the wheel back in place making sure that you loop the chain over the sprocket, apply a small amount of waterproof grease to the axle.
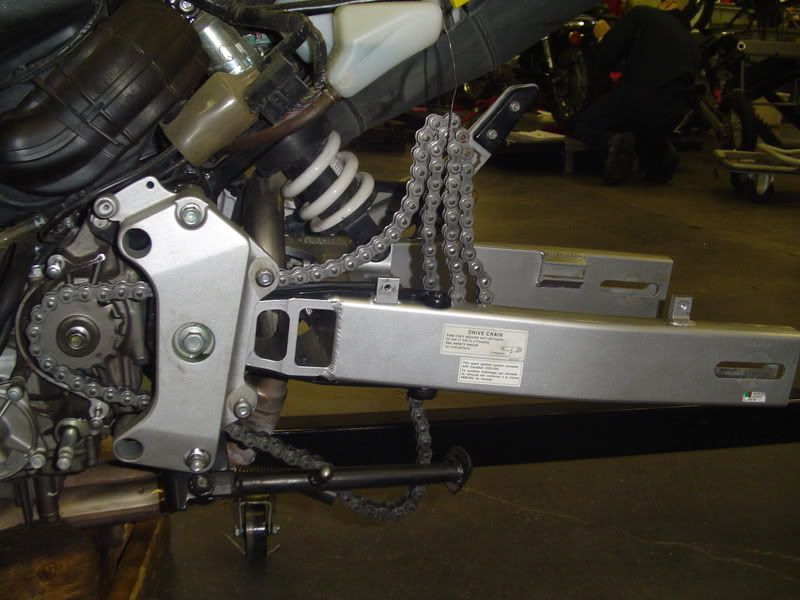
And there you have it, full reinstalled swing arm. Sounds easy doesn't it? Haha
I rebuilt a swing arm... and this is how she goes.
Hang her high! She with the swing arm off there's no way for me to possibly jack up the back end on my bike. All it takes is an engine lift and a come-along.
Start here... YIKES! Nothing on that bike, I bet it dropped about 50 lbs. Supersport here I come!
Pile of parts, all of these plus more go back onto the bike! I've got a sidepanel, seat, 2 swingarm adjusters, an axle, and a pivot bolt hidden inside cupboards and drawers.
I took the time to clean and relube my bearings. The left side has 2 sets of roller bearings, with 2 bushings and rubber seals. |Bushing|Bearing|Bearing|Bushing|. Make sure they roll smooth and pack some new water-resistant grease in there.
The left side is a set of needle bearings, so I just cleaned them up, added some new lube and put the bushing back inside it.
All my bearings were in good condition.
Make sure that everything is clean and dirt free, relatively speaking that is.
Stuff is tied up out of the dirt. You don't want a heavy brake caliper hanging from the brake line, or a chain sitting in the dirt.
Reinstall the chain slider on the swingarm. It's just a little bit of rubber, but it gives the chain something smooth to ride along, instead of cutting into the metal of the swing arm. I know two people that has happened to so far. Mines in good condition, so I should be okay.
Stick the swing arm into place, and secure the lower shock mount bolt, but don't torque it yet.
Make sure that the chain is correctly looped inside of the swingarm. I wish that I had waited until now to install a new chain, I could have done an endless one instead of a rivet-type.
Install the side plate and the swingarm pivot mount. Grease the pivot bolt with waterproof grease, just in case. Torque the pivot bolt and lower shock mount bolt into place.
Install the footpeg hanger bracket. I ran into problems here, which will be detailed later.
Install aftermarket hugger
Put the wheel back in place making sure that you loop the chain over the sprocket, apply a small amount of waterproof grease to the axle.
And there you have it, full reinstalled swing arm. Sounds easy doesn't it? Haha
Last edited by Sev on Fri Nov 10, 2006 11:51 am, edited 1 time in total.
Of course I'm generalizing from a single example here, but everyone does that. At least I do.
[url=http://sirac-sev.blogspot.com/][img]http://i12.photobucket.com/albums/a227/Sevulturus/sig.jpg[/img][/url]
[url=http://sirac-sev.blogspot.com/][img]http://i12.photobucket.com/albums/a227/Sevulturus/sig.jpg[/img][/url]
-
Sev
- Site Supporter - Gold
- Posts: 7352
- Joined: Sun Jun 06, 2004 7:52 pm
- Sex: Male
- Location: Sherwood Park, Alberta
Okay, so above a very briefly mentioned that I ran into trouble with reinstalling a part.
This is a lesson in the value of a torque wrench.
Three times now I've removed the left footpeg hanger bracket. Twice at home where I just tightened it as tight as I could get it. And once at school where I ran the bolts in to 20lb/ft.
So while I was trying to install the bracket this time (above) I torqued the bottem bolt to 20lb/ft and the top one to 18... it promptly loosened off, so I turned it more, it would tighten up a bit, then loosen off, then tighten up and loosen off.
Sure enough I had stripped it. Steel bolt into aluminum part what do you think broke? The part of course! $80 American for a new one if you count shipping Which isn't THAT bad, but still.
So if I have to get a new one anyways, I might as well try to fix this one. Because of how badly it was striped running a thread cleaner through there wouldn't work. So I basically had two choices. Get a longer bolt, and put a nut on the far end, or helicoil it. Because of where it's located I couldn't put a nut on the far side, it would interfere with the chain.
So out comes the helicoil kit. I didn't have the presence of mind to photograph it, I was too upset about stripping out the bolt hole. So I'm going to borrow pictures from Roadstar Magazine.


Drill the hole out to the required size (on the back of the helicoil package)

Use the supplied tap to create a new set of threads inside the larger hole


Then you just wind the helicoil into the hole that you tapped.
After that you run a punch down the inside and set it on the little tang that assisted you in winding it in. Smack the punch with a hammer and off comes the tang. A perfect bolt hole!
A helicoil is basically a spring made of diamond shaped wire. So it matches the original bolt threads, and the new ones that you carved. They're "much better" in that they are stronger and accept a bolt smoother. But they are slightly scary to install haha. I was VERY careful.
How could all of this have been averted? I should have been more careful about how I tightened the bolt the previous two times I had used it. Each time I went to tight and damaged the threads a little bit. On my third attempt, they just gave out.
This is a lesson in the value of a torque wrench.
Three times now I've removed the left footpeg hanger bracket. Twice at home where I just tightened it as tight as I could get it. And once at school where I ran the bolts in to 20lb/ft.
So while I was trying to install the bracket this time (above) I torqued the bottem bolt to 20lb/ft and the top one to 18... it promptly loosened off, so I turned it more, it would tighten up a bit, then loosen off, then tighten up and loosen off.
Sure enough I had stripped it. Steel bolt into aluminum part
So if I have to get a new one anyways, I might as well try to fix this one. Because of how badly it was striped running a thread cleaner through there wouldn't work. So I basically had two choices. Get a longer bolt, and put a nut on the far end, or helicoil it. Because of where it's located I couldn't put a nut on the far side, it would interfere with the chain.
So out comes the helicoil kit. I didn't have the presence of mind to photograph it, I was too upset about stripping out the bolt hole. So I'm going to borrow pictures from Roadstar Magazine.
Drill the hole out to the required size (on the back of the helicoil package)
Use the supplied tap to create a new set of threads inside the larger hole
Then you just wind the helicoil into the hole that you tapped.
After that you run a punch down the inside and set it on the little tang that assisted you in winding it in. Smack the punch with a hammer and off comes the tang. A perfect bolt hole!
A helicoil is basically a spring made of diamond shaped wire. So it matches the original bolt threads, and the new ones that you carved. They're "much better" in that they are stronger and accept a bolt smoother. But they are slightly scary to install haha. I was VERY careful.
How could all of this have been averted? I should have been more careful about how I tightened the bolt the previous two times I had used it. Each time I went to tight and damaged the threads a little bit. On my third attempt, they just gave out.
Of course I'm generalizing from a single example here, but everyone does that. At least I do.
[url=http://sirac-sev.blogspot.com/][img]http://i12.photobucket.com/albums/a227/Sevulturus/sig.jpg[/img][/url]
[url=http://sirac-sev.blogspot.com/][img]http://i12.photobucket.com/albums/a227/Sevulturus/sig.jpg[/img][/url]
-
Skier

- Site Supporter - Platinum

- Posts: 2242
- Joined: Sat Aug 07, 2004 10:44 am
- Sex: Male
- Location: Pullman, WA, USA
Sev, have you tried using a rear stand for chain maintenance and whatnot for the Hornet? I figure you have access to a couple of different kinds in your school. I'm curious which ones work and don't work for the 599.
[url=http://www.motoblag.com/blag/]Practicing the dark and forgotten art of using turn signals since '98.[/url]